Getting Started with the Vuforia Spatial Toolbox
This series of pages will give you an illustrated introduction to using the Vuforia Spatial Toolbox app. By the end of this section, you’ll know about a wide variety of things you can do in AR using the Spatial Toolbox app, and you should be ready to try it out for yourself. You’ll learn how to add new tools to a space and connect them together into spatial programs.
You’ll also learn how to set up a Vuforia Spatial Edge Server, if you want to do more with the app, and how to configure it through a web interface on your computer.
If you’re not a developer, this is the most important (and maybe the only) section for you to read.
If you are a developer, you should read this first, and then read the Develop section after you feel comfortable using the app and server.
Main Concepts
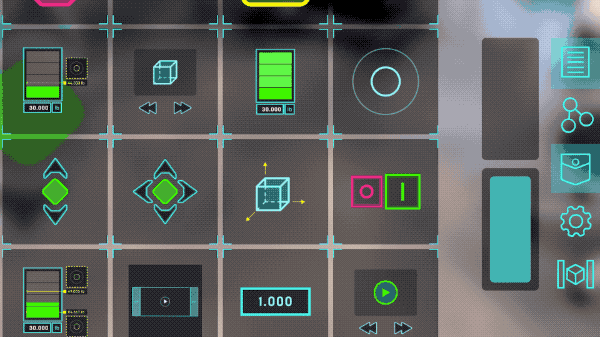
Tools
The Spatial Toolbox gives you a set of tools that you can add to your AR environment. Tools are pieces of AR content that can be added, moved around, and combined into spatial computing scenarios.
In this example, we take a graph tool from our toolbox and add it to the world.
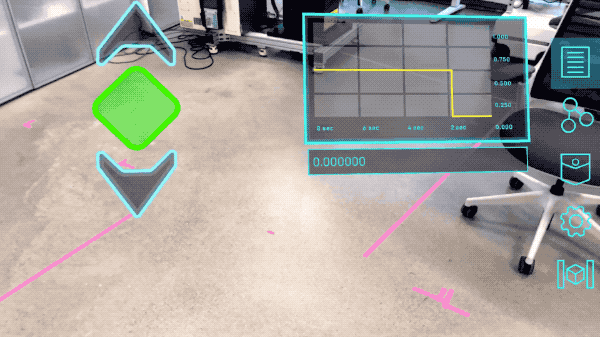
Nodes
Each tool can have one or more nodes. Nodes are programmable data points with a spatial location. They can act as an input for a tool, or an output, or both. By linking together the nodes of different tools, we create a data stream from one to the other. This lets us wire a set of tools together into a spatial program.
In this example, we connect a slider tool to a graph tool, so that when we drag the handle of the slider up and down we visualize the data it generates on the graph. This is the simplest example of a spatial program.
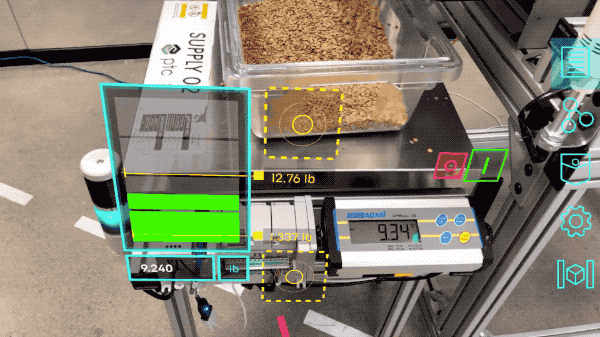
Objects
In addition to placing tools so that they “float” in the world in front of us, we can also attach them to specific objects that our Vuforia AR tracker can recognize. These can be as simple as a QR code or as complex as a 3D scan of a machine or larger space.
In this case, we’ve attached some tools to an industrial machine. The AR user interface appears when we approach the machine.
Note: You won’t be able to detect objects like this by default. To do that, you’ll need to learn about setting up a Vuforia Spatial Edge Server and configuring a set of objects on it.
Programming the Physical World
Tools become even more interesting when you bring in the ability to connect their data (their nodes) with things in the physical world. For example, using tools to visualize the data being generated by machines, or using the Toolbox to link multiple IoT devices into an automated process. How can we do this? We can set up certain nodes to read or write data to other systems and hardware, and then link those nodes to our tools.
In this example, the scale has a node for the weight value, which it reads using our Kepware connector. We have linked that node to the node of this tool to visualize how much weight is on it. You can see the UI change as we press down on the table. We then linked the output of this tool to the red light on the corner of the machine, so that the light turns red when the weight is larger than this tool’s threshold.
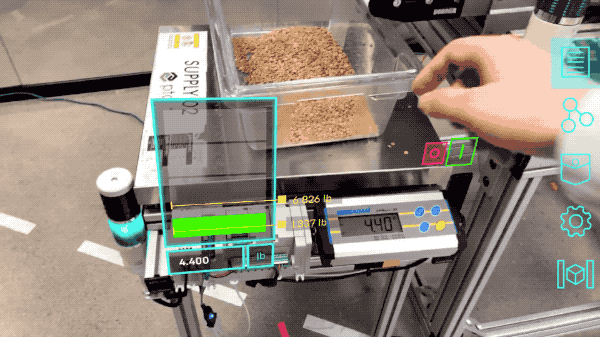
Again, this feature won’t be available by default if you just download the app. You’ll need to set up a Vuforia Spatial Edge Server and learn how to use Hardware Interfaces.
Read Next:
Using the App – this illustrated guide will teach you everything you need to know to use all the features of the Vuforia Spatial Toolbox app.